Lotus Biscoff Cheesecake Recipe
Introduction
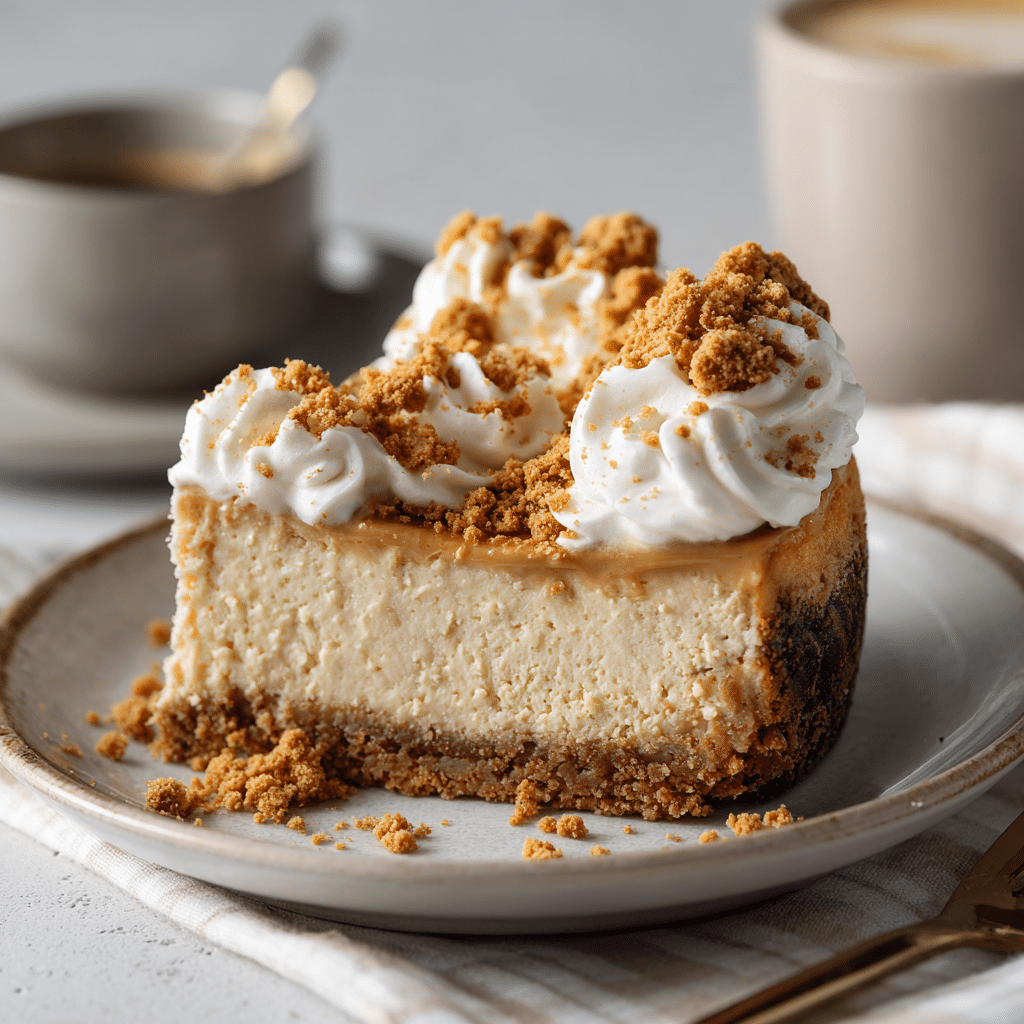
This Lotus Biscoff Cheesecake is a creamy, dreamy dessert infused with the rich and spiced flavor of Biscoff cookies and cookie butter. Its smooth texture and irresistible caramel notes make it a perfect treat for any occasion. Plus, it’s baked in a water bath to ensure a crack-free finish every time.
Ingredients
- 2 cups Biscoff cookie crumbs
- 1/3 cup packed light or dark brown sugar
- 1/4 teaspoon kosher salt
- 8 tablespoons unsalted butter, melted
- 4 (8-ounce) blocks full-fat cream cheese, softened to room temperature
- 1 1/2 cups packed light or dark brown sugar
- 1 tablespoon vanilla bean paste
- 5 large eggs, at room temperature
- 1/2 cup heavy whipping cream
- 1/2 cup smooth Biscoff cookie butter spread, melted
- 1/3 cup Biscoff cookie crumbs (for topping)
- Whole or broken Biscoff cookies, for garnish (optional)
Instructions
- Step 1: Preheat the oven to 350°F and position a rack in the center. Lightly grease the bottom and sides of a 9-inch springform pan or spray with non-stick spray. Wrap the bottom and sides of the pan with heavy-duty foil in several layers to prevent water seepage during the water bath. Set the pan aside.
- Step 2: In a large bowl, combine 2 cups Biscoff cookie crumbs, 1/3 cup brown sugar, 1/4 teaspoon kosher salt, and melted butter. Stir well to combine. Press the mixture firmly and evenly into the bottom of the prepared pan using the bottom of a glass or your hands.
- Step 3: Bake the crust for 10 minutes, then set aside to cool while preparing the filling.
- Step 4: Using a food processor, stand mixer with whisk attachment, or electric hand mixer, beat the cream cheese and 1 1/2 cups brown sugar together until very smooth. Scrape down the bowl sides as needed.
- Step 5: Add 1 tablespoon vanilla bean paste and mix. On low speed, add the eggs one at a time, beating just until combined after each addition.
- Step 6: Pour in the heavy cream and continue to beat until just combined. Stir in the melted cookie butter spread using a rubber spatula, folding until fully incorporated.
- Step 7: Pour the cheesecake filling over the cooled crust and smooth the top with an offset spatula.
- Step 8: Place the springform pan inside a larger deep pan or roasting pan. Pour hot water into the larger pan until it reaches about 2 inches high, coming halfway up the sides of the cheesecake pan to create a water bath.
- Step 9: Carefully transfer to the oven and bake for 1 hour and 10 minutes. When done, turn off the oven but leave the cheesecake inside with the door closed for at least 1 hour to cool gradually.
- Step 10: Remove the cheesecake and water bath from the oven. It should still have a slight jiggle. Unwrap and discard foil. Run a knife around the edges and set the cheesecake on a cooling rack to cool completely.
- Step 11: Loosely cover with foil and refrigerate overnight or at least 8–10 hours for best texture.
- Step 12: Once chilled, remove the cheesecake from the springform pan and place it on a serving platter. Pour melted cookie butter over the top, spreading evenly to create a drip effect. Chill again briefly to set the topping.
- Step 13: Sprinkle with Biscoff cookie crumbs and garnish with whole or broken cookies if desired. For clean slices, warm a large knife under hot water, dry it, and slice the cheesecake. Serve immediately and enjoy!
Tips & Variations
- Use room temperature ingredients to ensure a smooth, lump-free batter.
- Wrap the springform pan well with several layers of foil to prevent water from leaking into the cheesecake during the water bath.
- For a more intense Biscoff flavor, swirl some cookie butter into the crust before baking.
- Substitute vanilla bean paste with pure vanilla extract if unavailable.
- Top with whipped cream or caramel drizzle for extra indulgence.
Storage
Store the cheesecake covered in the refrigerator for up to 5 days. It can also be frozen for up to 2 months; thaw overnight in the fridge before serving. If freezing, wait to add cookies and cookie crumbs toppings until ready to serve for best texture and flavor.
How to Serve
Serve this delicious recipe with your favorite sides.
FAQs
Can I make this cheesecake without a water bath?
While you can bake it without a water bath, the water bath helps prevent cracks and creates a smoother texture. Without it, the cheesecake is more likely to crack or bake unevenly.
What can I use if I don’t have Biscoff cookie butter?
If you can’t find Biscoff cookie butter, you can substitute with peanut butter or another spiced cookie butter, though the flavor will differ. Alternatively, skip the cookie butter and increase the amount of Biscoff cookie crumbs in the crust and topping.
PrintLotus Biscoff Cheesecake Recipe
This rich and creamy Lotus Biscoff Cheesecake features a buttery biscoff cookie crust, a smooth and luscious biscoff-infused cream cheese filling, and a decadent biscoff cookie butter drizzle topping. Perfect for biscoff lovers, this cheesecake is baked in a water bath for a silky texture and crack-free finish. Garnished with biscoff cookie crumbs and optional whole or broken biscoff cookies, it makes an elegant dessert to enjoy any time.
- Prep Time: 20 minutes
- Cook Time: 1 hour 20 minutes
- Total Time: 10 hours 40 minutes
- Yield: 12 servings 1x
- Category: Dessert
- Method: Baking
- Cuisine: American
Ingredients
Crust
- 2 cups biscoff cookie crumbs
- 1/3 cup packed light or dark brown sugar
- 1/4 teaspoon kosher salt
- 8 tablespoons unsalted butter, melted
Cheesecake Filling
- 4 (8-ounce) blocks full-fat cream cheese, softened to room temperature
- 1 1/2 cups packed light or dark brown sugar
- 1 tablespoon vanilla bean paste
- 5 large eggs, at room temperature
- 1/2 cup heavy whipping cream
- 1/2 cup smooth biscoff cookie butter spread, melted
Topping
- 1/2 cup smooth biscoff cookie butter spread, melted
- 1/3 cup biscoff cookie crumbs
- Whole or broken biscoff cookies, for garnish (optional)
Instructions
- Prepare the crust: Preheat the oven to 350°F (175°C) and position a rack in the center of the oven. Lightly grease and then wrap the bottom and sides of a 9-inch springform pan with several layers of heavy-duty foil to prevent water seepage during the water bath baking. Set aside.
- Make the crust mixture: In a large bowl, combine biscoff cookie crumbs, brown sugar, kosher salt, and melted butter. Mix thoroughly until well combined. Press the crumb mixture evenly and firmly into the bottom of the prepared springform pan using the bottom of a glass or your hands.
- Bake the crust: Bake the crust in the preheated oven for 10 minutes. Remove and allow to cool while preparing the filling.
- Prepare the cheesecake filling: Using a food processor, stand mixer with whisk attachment, or handheld electric mixer in a large bowl, beat the softened cream cheese and brown sugar until super smooth, scraping down the sides as needed.
- Add flavorings and eggs: Mix in the vanilla bean paste thoroughly. On low speed, add the eggs one at a time, beating just until combined after each addition to avoid overmixing.
- Incorporate cream and cookie butter: Pour in the heavy whipping cream and blend until just combined. Fold in the melted biscoff cookie butter gently with a rubber spatula until fully incorporated.
- Assemble cheesecake: Pour the cheesecake batter over the cooled crust and smooth the top with an offset spatula for an even surface.
- Prepare the water bath: Place the springform pan inside a large, deep baking or roasting pan. Pour hot water into the larger pan to a depth of about 2 inches, reaching just below the sides of the cheesecake pan. This water bath helps prevent cracking and promotes even baking.
- Bake the cheesecake: Carefully transfer to the oven and bake for 1 hour and 10 minutes. After baking, turn off the oven, but leave the cheesecake inside with the door closed and undisturbed for at least 1 hour to slowly cool.
- Cool and chill: Remove the cheesecake and water bath from the oven. Expect a slight jiggle in the center. Unwrap and discard the foil. Run a knife around the edge to loosen the cake, then transfer it to a cooling rack to cool completely. Cover loosely with foil and refrigerate overnight (8-10 hours) for best results.
- Apply topping: Remove the chilled cheesecake from the springform pan and place it on a serving platter. Pour the melted biscoff cookie butter over the top and edges to create a beautiful drip effect. Refrigerate for a few minutes to allow the topping to slightly harden.
- Garnish and serve: Sprinkle biscoff cookie crumbs over the top and optionally garnish with whole or broken biscoff cookies. For clean slices, warm a large knife under hot water, dry it, and slice the cheesecake into wedges. Serve immediately.
- Storage: Store covered in the refrigerator for up to 5 days. The cheesecake can be frozen for up to 2 months; thaw overnight in the refrigerator. Add toppings fresh after thawing for best texture and flavor.
Notes
- Ensure all ingredients, especially cream cheese and eggs, are at room temperature for a smooth batter.
- Use several layers of heavy-duty foil to properly waterproof the springform pan during the water bath.
- Do not overbeat the eggs into the filling to prevent cracks.
- The water bath is key for preventing cracks and ensuring a creamy texture.
- Allow the cheesecake to rest in the oven with the door closed after baking for gradual cooling.
- To get clean slices, warm and dry your knife between cuts.
- Storage: Refrigerate up to 5 days or freeze up to 2 months; add toppings fresh after thawing.
- Optional garnishes enhance the biscoff flavor and presentation, but are not required.
Keywords: Biscoff Cheesecake, Lotus Biscoff, Cheesecake recipe, Biscoff cookie crust, Cream cheese dessert, Water bath cheesecake, No crack cheesecake